martes, 23 de febrero de 2016

MicroStrategy TaskProc and SOA Plataform

In service-oriented architecture, discrete chunks of functionality are built as services that can be accessed by many applications in many different ways. In MicroStrategy Web, these services are called tasks. Once an operation has been defined as a task in MicroStrategy Web, it can be called as a service from anywhere using any protocol. What this means is that you need to build a task only once, and it can then be used everywhere. Regardless of whether a task is called from HTTP, URL, Web Services, COM, .NET, or Java, the underlying implementation is the same.


There are many scenarios in which you might want to use services, in the form of MicroStrategy tasks, to insert BI data into an application. One very compelling use case would be the ability to make relevant BI data visible to all users at all times. For example, you might add KPIs or team performance indicators in the corner of an e-mail application. Other use cases include support for single sign-on, the ability to control the logic in a business process based on BI data, and the ability to create reusable functionality. So, for example, you could use a task to create a MicroStrategy session that allows seamless integration between enterprise applications and MicroStrategy. Or, you could create a task that returns product inventory on hand and then use the BI data generated by the task in your business logic to determine whether to perform an action such as automatic reordering.


The diagram below illustrates how the Task Infrastructure allows MicroStrategy functionality to be accessed from any client or protocol, leveraging the MicroStrategy Web service-oriented architecture (SOA).
There are a number of major benefits of using services, in the form of MicroStrategy tasks, rather than having Web API logic in an application. For example, services are:

  • Reusable
    If logic is embedded in an application it cannot be reused by another application. Services, on the other hand, are reusable across applications.

  • Abstracted
    When you use services to create an application, you don't need to worry about the logic or workflow of MicroStrategy. You simply need to understand the parameters required for the tasks you are using, and MicroStrategy takes care of the rest.0
     
  • Encapsulated
    Many different services can be accessed under the same architecture.
     
  • Discovery-based
    Services can be described so that they can be discovered by external mechanisms.

Several important product features in MicroStrategy Web—such as Flash dashboards, the Flex Builder-based Visualization SDK, and MicroStrategy Mobile—were built using the Task Infrastructure.

viernes, 22 de febrero de 2013

Customize MicroStrategy Web with MicroStrategy Customization Editor


MicroStrategy SDK provides a Web Customization Editor that can be used to create a customization plug-in. The following steps guide you in creating the plug-in and deploying it.

Creating a New Plug-in

This topic describes how to create a new plug-in using the Web Customization Editor. This plug-in will contain all the files related to your customization.

  1.    Launch the Web Customization Editor.
  2. Click on the toolbar for the Application Settings or the CSS Settings views to launch the Select Plug-In dialog.


3. Click New >>.
4. Enter a name for the plug-in in the Plug-in Name text field. 
5. Click OK.

The new plug-in folder gets created with the necessary subfolders (such as asp/jspstyle, and WEB-INF) inside the plug-ins folder in the MicroStrategy Web installation. The name of the plug-in displayed in the status bar at the bottom.

Replacing the MicroStrategy Web Button

This scenario deals with replacing the MicroStrategy Web Button with an image or logo of your choice. The task involves modifying a CSS file to update the reference to use a new image such that this customization is globally applied on all MicroStrategy Web pages. The MicroStrategy Web Button is used for navigating to the Welcome page. It comprises two images such that the second image is displayed when the mouse is hovered on it.

1. Launch the Web Customization Editor.
2. Click on CSS inside the CSS Settings view to expand the hierarchical tree. The expanded list comprises the different CSS files used in MicroStrategy Web.


3. Navigate to MicroStrategy Web Styles->style->mstr.
4. Click on mstr.css to expand the rules defined within this CSS file.
5. Click on .mstrLogo to expand the properties defined for the rule.
6. Double-click on background to launch the Update CSS Property dialog.
7. Click on Utils >> to view the Utilities panel.
8. Click the Image button on the Utilities panel to navigate to the image.
9. Select the image and click OK. The location of the image gets updated in the Value text field.
10. Make sure the Apply to All Pages radio button is selected.


11. Click OK. The updated background property gets added under the .mstrLogo rule inside a newly created 12. CSS file "golbal.css" under CSS->Customized Web Styles->style.
13. Click on A.mstrLink:hover .mstrLogo (under MicroStrategy Web Styles->style->mstr->mstr.css) to expand the properties defined for this rule.
14. Double-click on background-image to launch the Update CSS Property dialog.15. Click on Utils >> to view the Utilities panel.
16. Click the Image button on the Utilities panel to navigate to the image for the mouse-hover effect.
17. Select the image and click OK. The location of the image gets updated in the Value text field.
18. Make sure the Apply to All Pages radio button is selected.
19. Click OK. The updated background-image property gets added under the A.mstrLink:hover .mstrLogo rule inside the CSS file "global.css" under CSS->Customized Web Styles->style.
20. Launch MicroStrategy Web to view the customization.


jueves, 21 de febrero de 2013

Personalización del botón en MSTR Web con MicroStrategy Customization Editor


Personalizar la interfaz de MicroStrategy Web por medio del uso de MicroStrategy Customization Editor

La herramienta SDK MicroStrategy Customization Editor facilita tareas relacionadas con cambios cosméticos de la interfaz de MicroStrategy, pero lo primero es crear un nuevo plugin una tarea bastante sencilla.

Creación de un nuevo plugin

1.       En Eclipse haz clic en el botón del plugin en la barra del aplication settings de MicroStrategy Customization Editor.
2.        Haz clic en el botón nuevo>>
3.       Pon un nombre al plugin por ejemplo New_button
4.       Clic en aceptar y ya tienes el nuevo plugin.

Personalizar el botón de MicroStrategy Web.

Original:
Personalizado:
Vamos inicialmente a personalizar el logo que aparece en la barra superior de MicroStrategy en la interfaz Web:
1.       Crear la carpeta images dentro del plugin que hemos creado antes.


2.       Vamos a poner una imagen nueva para hacerlo un poco más real e interesante, movemos la imagen a la carpeta images recién creada y actualizamos en eclipse con F5 sobre la carpeta de plugins dentro del “package explorer” o “explorador de paquetes”.
  1. Clic en CSS dentro de la vista CSS Settings Expanda el árbol para ver la lista de archivos CSS utilizados en MicroStrategy Web.
     
  2. Navege hasta MicroStrategy Web Styles->style->mstr.
     
  3. Clic en mstr.css para expandir las reglas definidas dentro del archive CSS.
     
  4. Clic en .mstrLogo para expandir las  propiedades definas para las reglas.
     
  5. Doble clic en background para lanzar la ventana de dialogo actualización de propiedades CSS.
     
  6. Clic en Utils >> para ver el panel de utilidades.
           
  7. Clic en el botón de Imagen para navegar a la imagen.
     
  8. Selecciona la imagen y luego clic en OK. La location of the image gets updated in the Value text field.
     
  9. Asegurese que la opción All Pages está seleccionada en la columna Scope.
     
  10. Clic OK. La propiedad background actualizada se agrega bajo la regla .MstrLogo dentro de un nuevo archivo CSS "golbal.css" bajo CSS->Customized Web Styles->style.
     
  11. Clic en A.mstrLink:hover .mstrLogo (bajo MicroStrategy Web Styles->style->mstr->mstr.css) para ampliar las propiedades definidas por esta regla.
     
  12. Haga doble clic en la propiedad background para lanzar la ventana de diálogo para actualizar las propiedades CSS.
     
  13. Clic en Utils >> to view the Utilities panel.
     
  14. Haga clic en el botón de imagen en el panel de Utilidades para desplazarse a la imagen para el efecto mouse-hover.
     
  15. Seleccione la imagen y haga clic en Aceptar. La ubicación de la imagen se actualiza en el campo de texto Valor.
     
  16. Asegurarse que All Pages esta seleccionado.
     
  17. Haga clic en OK. La actualización de la propiedad background bajo la regla A.mstrLink:hover .mstrLogo en el archivo CSS "global.css" bajo CSS->Customized Web Styles->style.  
  18. Ejecutar MicroStrategy para ver las personalizaciones.

jueves, 14 de febrero de 2013

Getting Started MSTR Web SDK - Customization Editor


Getting Started With MicroStrategy Web SDK

The first step to take initial contact with MicroStrategy Web SDK you must do something that for sure you have never done before which is install MicroStrategy SDK. 
 (Bad joke)

Install MicroStrategy Web SDK is so easy. You only have to check the sdk option in the MicroStrategy installation process.
To finish follow the installation instructions at end you can find the sdk folder in C:\Program Files\MicroStrategy\SDK

Once you have installed MicroStrategy SDK you have the MicroStrategy Customization Editor, with this tool you can start to customize the MicroStrategy Web.

MicroStrategy Customization Editor

Is an eclipse plugin that allow you customize MicroStrategy Web in a easily and faster way than manually.

Installation

MicroStrategy Customization Editor is an eclipse plugin for this reason you have to download eclipse in your computer for this you can access the Eclipse project download page in http://www.eclipse.org/downloads/
Select the option “Eclipse IDE for Java EE Developers”.
Once downloading finished you have to unzip and extract in any folder and it’s ready to use.
Navigate to the MicroStrategy SDK installation folder and access the Web Customization Editor plug-in installed inside the tools\WebCustomizationEditor subfolder.

Unzip and extract com.microstrategy.web.sdk.webcustomization.zip to the eclipse subfolder inside your Eclipse installation folder.
This extracts the JAR file,com.microstrategy.web.sdk.webcustomization.jar, into the eclipse\plugins subfolder inside the Eclipse installation folder.

Configuration in eclipse
This topic illustrates how to deploy and configure the Web Customization Editor.
  
Navigate to the Eclipse installation folder, and double-click on eclipse.exe to launch Eclipse.
 
·         Launch the Preferences dialog from Window->Preferences and do the following:
·         Click the MicroStrategy preference on the left and make the following settings on the right.
·         In the Application Root field under MicroStrategy location and URL settings, browse to the root folder where MicroStrategy Web is installed. 
·         In the MicroStrategy Web URL field under MicroStrategy location and URL settings, enter the URL for launching MicroStrategy Web.
·         Click Apply.
·         Click OK.
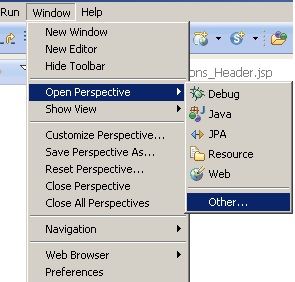
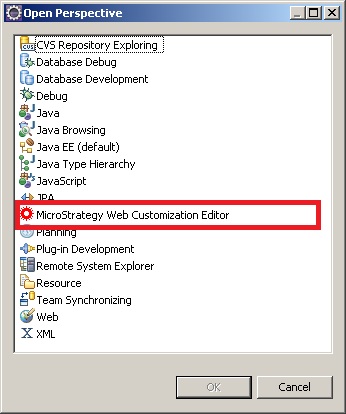
·         Go to Window->Open Perspective->Other, select MicroStrategy Web Customization Editor and click OK.
 
·         The Web Customization Editor is launched with two views open—Application Settings and CSS Settings. Note that a new MicroStrategy menu is added to the default Eclipse menu.

Note: If you close the Application Settings or the CSS Settings views and need to access them again, go to Window->Show View, and select the appropriate view.


miércoles, 13 de febrero de 2013

Toma de Contacto con MicroStrategy Web SDK


Si quieres empezar a tomar contacto con SDK o por lo menos conocerlo un poco lo primero que debes hacer es algo que seguro nunca antes habías hecho y es instalar el MicroStrategy SDK.
La pregunta entonces es ¿desde dónde se instala? La respuesta es muy sencilla en el instalador de MicroStrategy veras una opción que corresponde a este producto.


Los pasos son seleccionarlo y ya esta se creara un nuevo directorio dentro de la ruta que has escogido para instalar MicroStrategy. Por ejemplo:
C:\Program Files\MicroStrategy\SDK
Dentro de esta carpeta versa las subcarpetas :


Ahora te voy a presentar al MicroStrategy customization editor que es la herramienta principal para empezar a trabajar con SDK

MicroStrategy Customization Editor

El MicroStartegy Customization editor es un plugin para eclipse que nos permite realizar las personalizaciones sobre MicroStrategy Web de una manera más fácil y rápida que si lo tuviéramos que hacer manualmente

Instalación de MicroStrategy customization Editor

Lo primero que debes hacer es descargar Eclipse desde la página de este proyecto, si deseas más información acerca de que es eclipse puedes consultarlo en la Wikipedia:
Puedes descargar la última versión de eclipse desde:
Descarga la opción Eclipse IDE for Java EE Developers.  Una vez que has descargado Eclipse puedes descomprimir el archivo en un directorio y ya estar listo para usar.
Para desplegar en eclipse el plugin correspondiente a MicroStrategy customization editor debes buscar el archivo com.microstrategy.web.sdk.webcustomization.zip el cual lo puedes encointrer en “SDK\tools\WebCustomizationEditor” desde el directorio en el que has instalado  MicroStrategy.
C:\Program Files\MicroStrategy\SDK\tools\WebCustomizationEditor
Descomprimes este archivo directamente sobre el directorio del eclipse que has descargado y se creara el archivo “com.microstrategy.web.sdk.webcustomization.jar “  en la carpeta plugins dentro de eclipse.

Configuración de MicroStartegy Customization Editor

Para configurarlo solo inicias eclipse y seleccionas el menú de Windows y seleccionas el submenú preferencias y allí en l a ventana que se despliega en la parte izquierda veras una especie de navegador en el que encontraras un aparte MicroStrategy   allí veras algo como:


Y en el primer ítem Aplication Root das clic en el botón browse seleccionas el folder en el cual tienes instalado MicroStrategy Web que normalmente será: C:\Program Files \MicroStrategy\WebAsp, bueno si tu Windos (lease Windows ) está en español será C:\Archivos de programas\MicroStartegy\ASPx
En MicroStrategy Web URL pones la URL local del equipo es decir http://localhost/Microstartegy/
El resto de cosas las dejas tal y como vienen.


Bueno creo que ya estamos ahora solo tienes que dar en ok y abrir la perspectiva MicroStrategy Customization Editor, esto lo puedes hacer desde el menú Window -> Open perspective-> Other…

Aquí buscas Microstartegy Web Customization Editor


Y veras un proyecto Web_Mstr, en la izquierda del eclipse además del package browser puedes ver la pestaña Application Settings y CSS Settings.


Ya lo tienes ¡!! Ahora a personalizar el MSTR Web


Resumen para perezosos
1.       Instalar MicroStrategy Web y MicroStrategy SDK con el instalador de MicroStartegy para Gindos.
2.       Descarga de aquí el Eclipse Juno con el Mstr Configuration Editor incluido.
3.       Descomprimirlo en el directorio C:\eclipse
4.       Ejecutar c:\eclipse\eclipse.exe
5.       Seleccionar el menú Windows->preferencias
6.       Seleccionar la opción MicroStrategy  a la izquierda.
7.       Poner la ruta en la que has instalado el MicroStrategy Web en
8.       Poner la url (http://localhost/MicroStrategy/aspx/main.aspx) en
9.       Abrir la perspectiva MicroStrategy Customization Editor.